Avoid Costly Lawsuits with Continuous Accessibility Testing using Probo.CI and Tenon.IO
Recently, website accessibility has become a priority for many organizations. Being noncompliant with accessibility laws can be costly and lead to serious fines and poor publicity for the organizations and businesses involved. Fortunately, there are strides being made to help improve the process of verifying web accessibility compliance.
This post discusses how we at Zivtech use certain tools to ensure that we’re testing accessibility as part of our continuous integration workflow. It also introduces the process I like to call Continuous Accessibility Testing or CAT. We’ll have to see if the term CAT catches on, but for now, let’s take a look at how you can set CAT up for your own website.
Tools for Continuous Accessibility Testing
Zivtech developed a Continuous Integration tool called Probo.CI that generates a preview site for developers so that they can test their changes within a Git repository. Several steps in a YAML config file can be combined to configure a complex CI build, that if completed successfully, will provide a handy URL to share for review or feedback.
We have been improving the workflows of Probo.CI users over the last four years and have tested many useful tools along the way. One tool that we’ve found particularly useful along the way is called Tenon.IO.
Tenon.IO is a website accessibility testing tool that has a robust API and UI for running accessibility tests on your websites. It can be run manually within their UI, or if you want to automate this process, you can configure it in a Continuous Integration tool like Probo.CI to kick-off a test each time we push a new commit to our pull request feature branch.
The example in this post will be using Probo.CI to automate accessibility tests on Drupal 8’s Umami installation profile using the Tenon.IO API.
Let’s get started!
Add your site’s codebase to GitHub, GitLab, or Bitbucket.
Today, most development teams are using Git or some other form of version control system. This is mainly due to the fact that there are reliable Git remote repository hosting companies that provide some amazing features. Probo.CI currently supports integration with GitHub, GitLab, Bitbucket, and self-hosted servers for Bitbucket Server and GitLab Server.
Create a public or private repository on a supported service or hosted server and commit your site’s codebase. Once your codebase is available you can register for Probo.CI and start adding your repos.
The examples in this post will be using a GitHub repository, but you can fork our GitHub example, GitLab example, or Bitbucket example to follow along with this post depending on what service you prefer. Fork one of those examples and let’s get set up on Probo.CI.
Register for Probo.CI
During the registration process you will need to allow the Probo.CI app to authenticate with some permissions to your remote hosting service or self-hosted service. This will allow Probo.CI to create the webhooks it needs and read the information from your repositories to create your builds.
You will also need to subscribe to a subscription plan for the Probo Organization associated with the repositories you want to enable in Probo.CI. A two-month free trial is available for new organizations, and the plan can be changed at any time during the trial period to best fit your team’s needs.
Activate Repositories
Once a Probo Organization has been set-up with a subscription, your team can start activating repositories within that organization.
- Click the Activate repos button to get to the repository management page.
- Click the Sync repos button to pull in repositories from your account.
- Click the toggle next to a repository to enable Probo.CI for that project.
You can verify this was completed successfully by checking the Webhooks settings on your Git repository. You should see a new webhook for app.probo.ci.
Example: https://app.probo.ci/github-webhook
Next, let’s get registered on Tenon.IO to get our API key.
Register for Tenon.IO
Registering for tenon.io is a fairly simple process, as they also have a free trial. Click here to get started.
Once you’re signed up you’ll need to generate a Tenon.IO API key.
Generate a Tenon.IO API Key
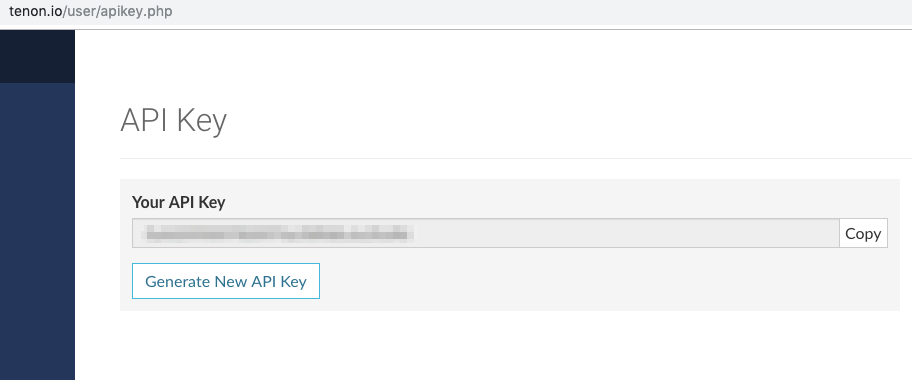
We will be using a Tenon.IO API key to automate tests through Probo.CI. See https://tenon.io/user/apikey.php to generate and access your API key. Once you have the key you can set it up in a .ENV file in your Probo.CI project’s assets.
Create a .ENV file on your local machine with the following contents. Replace
YOUR_API_KEY
with the API key you got from Tenon.IO.
TENON_KEY=’YOUR_API_KEY’
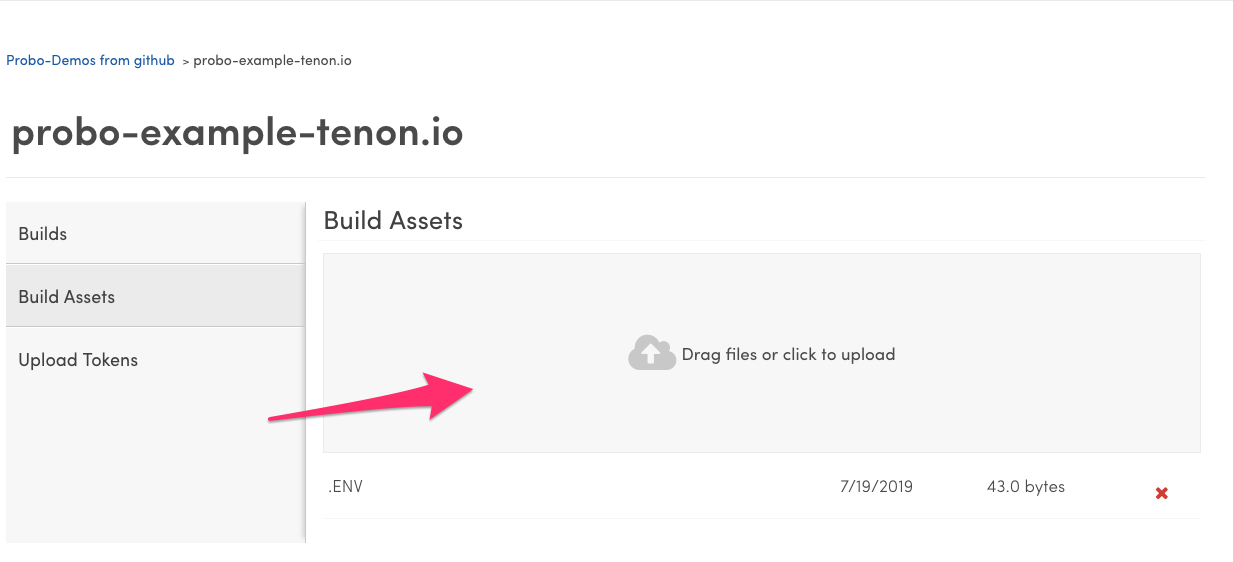
Go to the Assets tab on your Probo.CI project to upload your .ENV file by dragging and dropping it or click to upload.
Add Tenon.IO Tests to Your Build Steps
We have already added the Tenon.IO test build step to our example repository, but if you are looking to add Tenon.IO tests to test your own site you can use the following example below.
The following example is added as an additional step in your Probo Build so that it sends a request to the Tenon.IO API using curl. It also gets the corresponding responseID value from the report and prints the URL of the Tenon.IO test in the build steps.
First you need to include the .ENV file you set up in the assets section of the YAML config.
assets:
  - .ENV
You can also use the assets section to include a specific database to use for your site to test with.
Then you need to set up the Tenon.IO test step as an additional step in your .probo.yaml file. We are using the $TENON_KEY environment variable we set up in the .ENV file, as well as the $BUILD_DOMAIN environment variable available to all Probo Builds that references the resulting Probo Build URL.
- name: Tenon.io test
  plugin: Script
  script: |
    source /assets/.ENV > /dev/null 2>&1
    curl -X POST -H Content-Type:application/x-www-form-urlencoded -H Cache-Control:no-cache -d 'url='"$BUILD_DOMAIN"'&key='"$TENON_KEY" https://tenon.io/api/ > /src/web/response.json
    echo "View response file at $BUILD_DOMAIN/response.json"
    RESPONSE_ID=`curl -s $BUILD_DOMAIN/response.json | sed -e 's/[{}]/''/g' | awk -v RS=',"' -F: '/^responseID/ {print $2}' | tr -d '"'`
    echo "View Accessibility report on Tenon.io, https://tenon.io/history.php?responseID=$RESPONSE_ID"
Configure a Probo Build
We are using the .probo.yaml file in the example repo, but a custom Probo Build can be configured by adding a .probo.yaml file to the root of your enabled repository with your custom build steps. Once the .probo.yaml file is configured in a new branch, a pull request or merge request can be created to call the Probo.CI API and start your Probo Build.
See the Probo.CI Build Configuration docs for more details on configuring custom .probo.yaml steps.
For our example we are going to build a Drupal 8 website running the Umami profile and test it with Tenon.IO’s API as defined in the .probo.yaml file in our example. A Drupal 8 site running the standard profile will be built using the example repository we cloned earlier, so all we need to do is change the Install Drupal site. step to use the demo_umami profile instead of standard.
Search for the following line in the .probo.yaml file.
vendor/drush/drush/drush site-install -y --root=/var/www/html standard --db-url='mysqli://root:strongpassword@localhost/drupal'
Change it to:
vendor/drush/drush/drush site-install -y --root=/var/www/html demo_umami --db-url='mysqli://root:strongpassword@localhost/drupal'
You can use your own codebase instead by modifying the .probo.yaml file for your site’s specific needs.
- Run
git pullorgit fetchto get the latest commits on your master branch. - Create a feature branch for your changes based off of your master branch
git checkout -b my-feature-branch - Add the file to your repository and commit it to a new git branch.
git add .probo.yaml - Push the changes to your feature branch.
git push --set-upstream origin your-branch-name
Now you need to head over to your git remote host to create the Pull Request or Merge Request against your upstream branch, typically master.
Create a Pull Request or Merge Request
Create a pull request or merge request with your custom .probo.yaml file to start your first Probo Build. In our example we used our GitHub repository to make our changes, so we created a pull request there with our changes. You will see the build steps you setup running as checks at the bottom of your pull request.
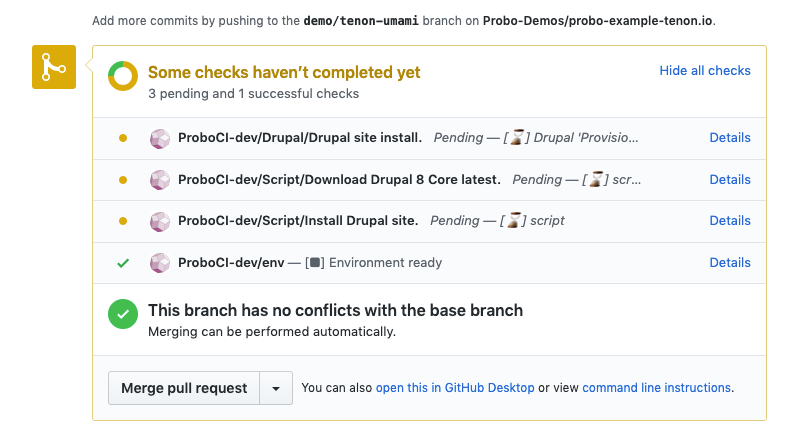
Each new commit to your pull request or merge request at this point will re-run your build steps and generate a new isolated preview site using the steps configured in the .probo.yaml file.
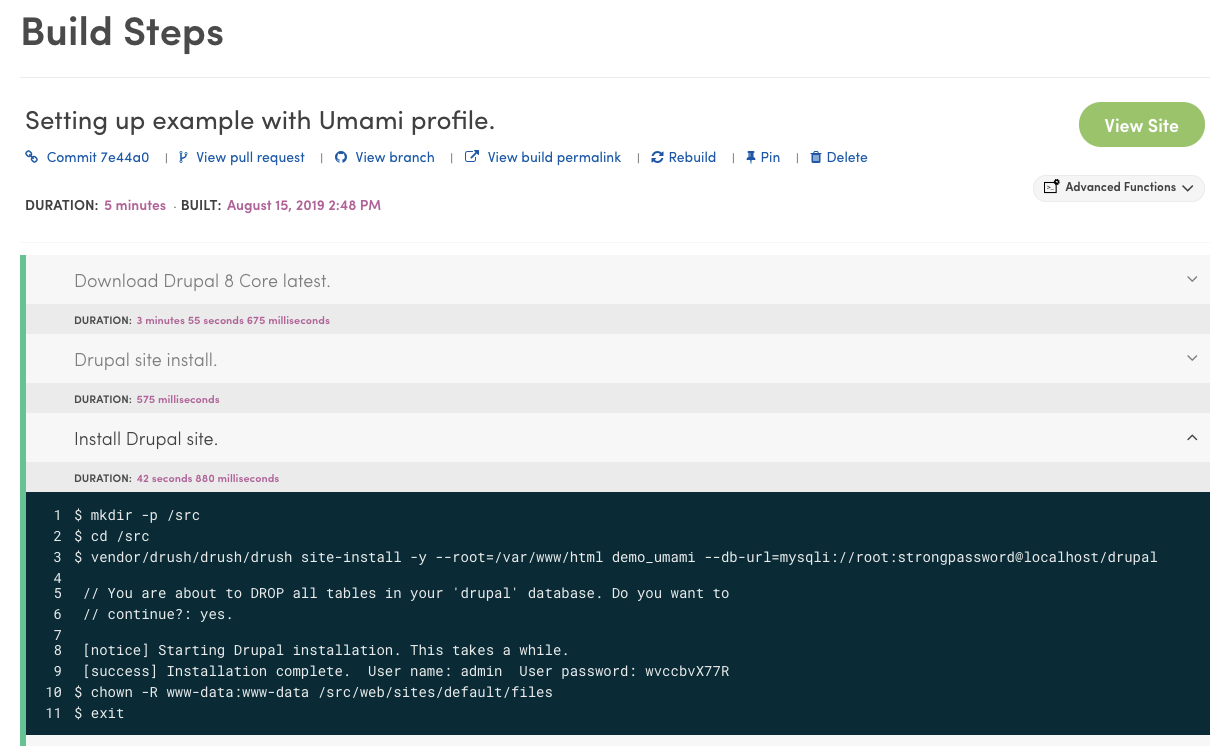
Clicking the Details link next to any step will take you into the Probo.CI app to view the logs for that step.
Below is our Install Drupal site step where we install the Umami profile.
View the Preview Site
A successful Probo.CI Build generates a preview site with a handy URL to view the site and easily share with team members or project stakeholders for rapid feedback.

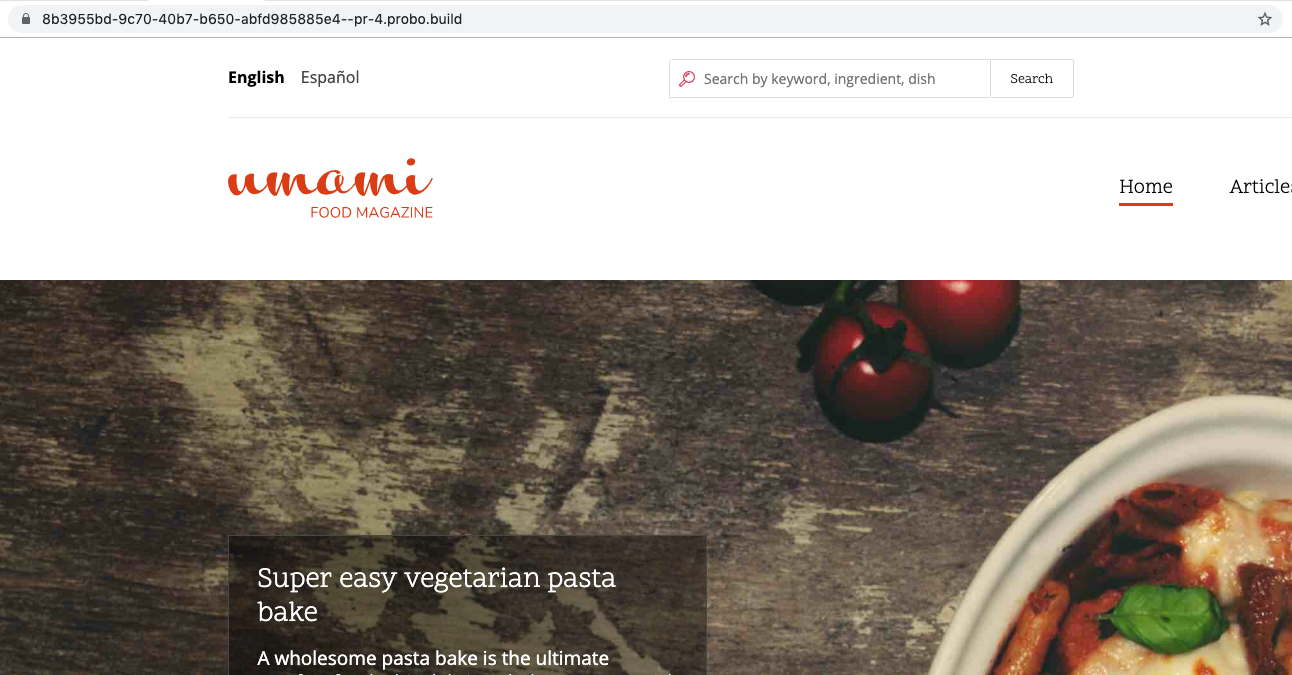
Below is the URL to the preview site for our example pull request.
https://8b3955bd-9c70-40b7-b650-abfd985885e4–pr-4.probo.build/
We have the preview site working now, so it is time to view our Tenon.IO accessibility test results on Drupal 8’s Umami profile.
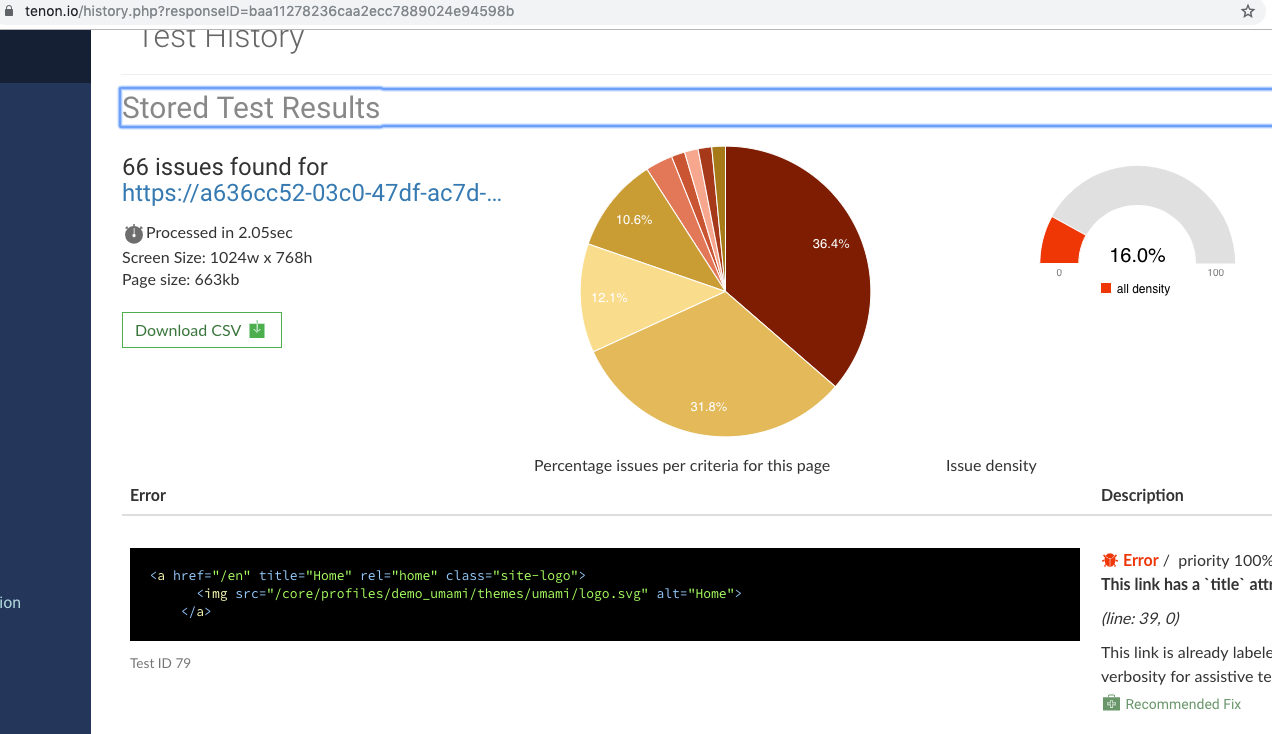
View the Tenon.IO Accessibility Test Results
You can view the results of the Tenon.IO tests in both a file that is generated in the Probo Build at /response.json, or view the tests results on the Tenon.IO website at https://tenon.io/history.php?responseID=$RESPONSE_ID. These results are based on RESPONSE_ID received back from the curl command in the .probo.yaml step that was configured.
Rinse and Repeat
Each new commit you make to your pull request or merge request will now be tested through the Tenon.IO API using Probo.CI automatically as part of your workflow. You can layer on additional steps to send notifications or do additional testing as needed. You now have the tools you need and a blueprint for setting up Continuous Accessibility Testing that will allow you to repeat this testing process for any project.
Most of the work involved in verifying compliance with accessibility laws can be automated, but the Continuous Accessibility Testing workflow is not 100% perfect. Additional manual testing should always be done for the best accessibility compliance. CAT can, however, provide both historical data and reports that can be used to prove that work is being done to resolve any outstanding accessibility compliance issues. Help your organization or clients avoid costly lawsuits by integrating your website with Continuous Integration tools like Probo.CI and accessibility testing tools like Tenon.IO. Be proactive instead of reactive to accessibility compliance using a Continuous Accessibility Testing workflow.